Gorgeous wood finishes have long been a central element of countless houses in our area. These surfaces deliver coziness, character, and notable appeal to your residence. After many years of use, even so, sometimes even the truly durable materials can show marks of wear. Scratches, flat sheens, and minor damage are routine. These problems can cause your whole interior seem worn and behind the times. A lot of homeowners and landlords believe a full replacement is the only answer.
See Details About Hardwood Floors in Boise
This guide walks through a better, budget-friendlier approach. Professional restoration can breathe new life into your original floors. We’ll detail the whole process, from initial inspection to the finishing protective coat.
You’ll learn the important gaps between a simple refinishing job and a full restoration job. Grasping your options enables you pick the smartest choice for your unique needs and investment.
Main Takeaways
- Restoring your current wood flooring is often a more affordable and less disruptive choice than starting over.
- Professional renewal can repair scratches, eliminate discoloration, and restore the original look and shine of your floors.
- Choosing trained nearby specialists makes sure the job is done the right way with premium finishes and machines.
- A successful project not only improves your interior appearance but also boosts its overall value.
- Good upkeep after the work is complete will preserve your results for many years to come.
- This resource gives the insight you need to plan and execute your job with confidence.
Restore Your Boise Home’s Beauty With Professional Floor Restoration
Authentic plank floors carry a history, showing generations of life at home and architectural heritage. This unique charm is what so many homeowners love. As time passes, though, everyday life shows up.
Wear marks, washed-out spots, and little blemishes can build up. Your interior may slowly look less fresh. Professional revival is the most reliable method to restore the true glow.
This work tackles damage that basic cleaning cannot solve. Heavy scratches, stubborn stains, and patchy traffic wear are all corrected. Trained pros take care to provide a near-new look.
Companies with deep local knowledge are invaluable. For example, Sunshine Hardwood Flooring offers 40 years of hands-on experience. This team knows the particular requirements of finishes in our area.
That careful work is vital for historic residences. It maintains the workmanship found in the historic Northend or Craftsman-style houses. Your home’s story is kept intact, just beautifully refreshed.
Refreshing Your Floors: Problem Vs. Solution
| Signs Your Surfaces Need Professional Attention | What a Professional Process Addresses |
|---|---|
| Deep scuffs and gouges from pets or moving furniture | Complete sanding to level the surface and remove damage |
| Deep stains caused by water spills or other liquids | Stain removal techniques and potential board replacement |
| Worn-down traffic paths that look dull and faded | Uniform refinishing to restore consistent color and sheen |
| Squeaky boards, loose planks, or uneven sections | Fixing and fastening the subfloor and boards |
| Overall dullness and a worn protective coat | Applying new, durable sealants and topcoats |
The outcome is a surface that reclaims its protective qualities. It safeguards your investment for the future. You also enjoy a stunning visual upgrade.
This upgrade noticeably boosts the overall appeal of your home interior. It contributes to your property’s resale value and pull. Selecting experienced professionals ensures proven methods and premium finishes are used.
A beautifully renewed foundation creates a new canvas for your décor. It becomes a central point of pride in your home. The change is often night-and-day.
Heritage Hardwood Flooring in Boise helps homeowners select hardwood flooring that fits their personal style and home, with the goal of achieving the look and elegance they’ve envisioned.
Your whole home will seem refreshed, looked after, and visually cohesive. It’s a high-impact way to respect your home’s past while supporting its years ahead.
The Advantages Of Choosing Floor Renewal
If your home’s core wood surfaces start to show their age, a professional refresh provides several compelling benefits over a full tear-out. This approach is not just about addressing visible wear. It’s a strategic upgrade that enhances your interior in multiple ways.
Cost-Effective Alternative To Full Replacement
Deciding to restore your current surfaces is a financially smart move. As noted by industry pros like Footprints Floors, this service costs only a fraction of a brand-new installation. You avoid the steep material and labor costs of a completely new project.
This makes it a wise improvement project. It delivers significant results without the huge price. A lot of clients are pleasantly surprised by the solid value.
Sunshine Hardwood Flooring emphasizes that even very worn boards can appear like new at an approachable price. You get a beautiful refresh for your interior. The spend is often made back through higher resale value.
Preserving The Character And History Of Your Home
Authentic hardwood keeps a distinct legacy that newer products cannot replicate. The grain, natural variation, and aged patina are one-of-a-kind. Professional care preserves these special elements.
This maintains the architectural character and story of your property. It is crucial for older homes or homes where original workmanship is a main highlight. Your interior retains its true character while looking tastefully updated.
This work celebrates the original era. It ensures that the unique elegance of mature wood remains to be a standout part of your home. That connection to the past is a reward you simply cannot purchase.
Enhancing Durability And Longevity
The restoration process does more than boost appearance. It actively strengthens your wood for the long term. Sanding down to bare wood and applying new, premium finish layers creates a strong protective barrier.
That fresh protective layer protects against daily wear-and-tear. It provides reliable resistance to scratches, accidental spills, and daily foot traffic. The usable life of your surfaces is extended by many years ahead.
Expert work also cuts down down-the-road repair bills. Experts fix small issues before they become big problems. Their deep know-how with wood properties produces a strong result that stands the test of time.
Requesting a free estimate this week can help you see the specific benefits for your home. You’ll see how this service can preserve your floors and improve your daily life.
What Is Boise Floor Restoration?
A full revival service goes well beyond than a quick update. It focuses on the structural health of your home’s wood floors.
According to Footprints Floors, this work involves repairing more serious damage. This can include swapping out damaged boards or correcting structural issues.
Sunshine Hardwood Flooring describes it as repairing, sanding, staining, and re-finishing very worn or dated wood floors and stairs. It is a full-scope project for materials with significant wear.
It’s a step-by-step workflow. It typically involves resolving structural problems first. Severely damaged planks are changed out.
Next, professional sanding removes old finishes and surface imperfections. This flattens the material and sets it for new color.
The final stages are applying new stains and protective coatings. The goal is a near-new condition that also returns integrity.
This approach is different from basic cleaning or small touch-ups. It is designed for surfaces with deep scratches, water stains, or a lifetime of wear.
Local professionals use this method to transform outdated or damaged sections. They often blend new work to existing sections for a seamless look.
“Our work is focused on restoring beauty and function, so the surface lasts for many more years,” says a specialist from Sunshine Hardwood Flooring.
The objective is not just cosmetic improvement. It is to rebuild the material’s integrity and functionality for long-term use.
This solution is recommended when damage is too extensive for standard hardwood floor refinishing to address. It requires specialized knowledge of wood types and regional climate.
By choosing this project, homeowners salvage their original hardwood. This material is often of superior quality than modern alternatives.
It is a personalized service. The specific steps always vary based on the initial assessment and the homeowner’s desired final sheen.
Restoration Vs. Refinishing: Know Your Options
Property owners often face a big decision when their wood floors show wear. They must choose between refinishing and a more complete restoration. Understanding the difference saves you both time and hassle and cost.
The right option depends entirely on the condition of your material. A proper understanding leads to the right solution for your property.
What Is Hardwood Floor Refinishing?
Hardwood refinishing is a finish-focused renewal service. It focuses on the top layers of your material.
According to Footprints Floors, it involves sanding work down to bare wood. This removes the old finish, light scratches, and minor stains.
A new stain and protective topcoat are then applied. This work is ideal for surfaces that are flat or lightly worn.
The wood itself must be structurally sound. This service gives your space a updated look without major repairs.
What Is Comprehensive Floor Restoration?
Restoration is a more in-depth solution. It goes beyond the surface to fix deeper problems.
Full restoration includes all steps of refinishing. It starts with needed repairs first.
This can mean installing warped boards or eliminating squeaks. It addresses liquid damage, rot, or major gaps.
The goal is to fix damage that affects the wood’s integrity. It’s for surfaces with major, deep issues.
Your hardwood floors regain both visual appeal and long-term function.
Refinishing vs. Restoration: A Side-by-Side Guide
| Service Option | Best For When | Key Actions | Outcome |
|---|---|---|---|
| Hardwood Floor Refinishing Service | Moderate surface wear, dull finish, light scratches. | Sanding to bare wood, applying new stain and finish coats. | A like-new surface with refreshed color and protection. |
| Full Floor Restoration | Broken boards, cupping, deep staining, rot, and structural issues. | Board replacement and structural repairs, followed by full sanding and finishing. | A fully renewed, structurally sound surface that lasts for years. |
How To Choose The Right Service
The decision hinges on a professional assessment. An experienced team can provide the most accurate advice.
In general, if damage is only on the surface, refinishing does the trick. If boards are broken or soft, restoration is required.
For localized damaged spots, targeted repair might be an option. Experts from reputable companies evaluate your specific situation.
They recommend the right approach for lasting performance and beauty. Getting this right the first day ensures a successful result.
It also preserves your investment and streamlines future upkeep. Always consult with professionals for your final plan.
The Professional Floor Renewal Process
The path to restore your home’s wood surfaces follows a reliable, step-by-step approach. This methodical workflow is what separates a fast patch from a durable transformation. Professional crews ensure every detail is handled correctly.
From the first consultation to the final walkthrough, each phase builds upon the last. Knowing these steps makes sense of the project and sets realistic expectations. It highlights the value of hiring skilled professionals.
Step 1: Full Assessment And Consultation
Every successful job begins with a detailed evaluation. A professional team visits your home to inspect the rooms in question. They examine the extent of wear, scratches, and any water damage.
This on-site meeting is a collaborative discussion. You share your vision for the final finish and discuss practical goals. The experts measure the space and assess the hardwood flooring condition.
A clear, written estimate is provided outlining the scope scope, timeframeline, and cost. This step ensures everyone is aligned from the first day. It establishes the foundation for a smooth project.
Step 2: Repair And Preparation
Before any cosmetic work begins begins, structural integrity is addressed. This is a crucial phase where true renewal happens. Cracked or damaged boards are carefully replaced to match your existing hardwood floor.
Loose planks are secured, and gaps are filled. Any subfloor issues are corrected to prevent future squeaks. This preparatory phase ensures a solid base for the refinishing stages.
Sunshine Hardwood Flooring emphasizes replacing compromised boards as a key first action. The space is then completely cleared and prepared for the major sanding operation. Proper preparation prevents problems later.
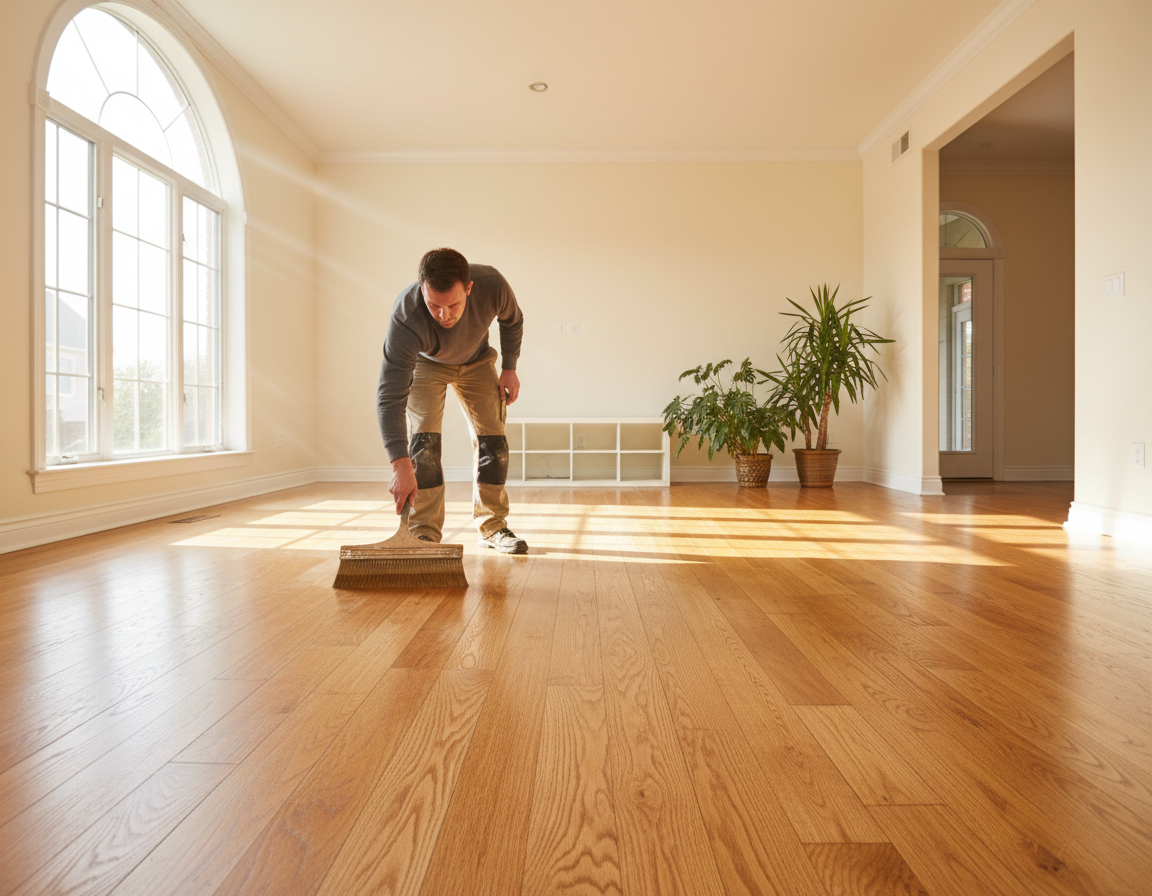
Step 3: Sanding And Leveling
This step transforms the surface. Using state-of-the-art, dust-controlled equipment, professionals perform hardwood refinishing at its core. They sand through progressively finer grits to remove all old coating and imperfections.
The goal is to reach a perfectly smooth, bare timber canvas. This levels the entire surface, eliminating minor dips and scratches. As Footprints Floors notes careful attention to detail here is paramount.
Buffing follows the sanding to polish the surface. This ensures an even texture ideal for accepting new stain. The wood floors are now ready for their new color and protection.
Step 4: Staining And Finishing
This phase defines the aesthetic and durability of your hardwood. If a color change is desired, professionals apply high-grade stains like DuraSeal by Minwax. Sample stains are often tested so you can choose the perfect shade.
The final, protective topcoat is then applied. Experts typically use multiple coats for resilience. Options include water-based finishes for low odor, oil-based for classic durability, or fast-drying Glitsa products.
Each coat is buffed between applications. This creates a smooth, level, and long-lasting protective layer. The result is a beautiful look designed to last for many years ahead with proper upkeep.
Overview Of The Professional Renewal Steps
| Stage | Primary Objective | Key Actions & Tools |
|---|---|---|
| Assessment And Consultation | Set scope and align expectations. | On-site inspection, evaluate damage, detailed estimate, goal discussion. |
| Repairs & Preparation | Ensure structural soundness and a stable base. | Replace damaged boards, secure loose boards, fix subfloor issues, clear the area. |
| Sanding And Leveling | Create a smooth, bare-wood surface. | Dust-controlled sanding through multiple grits, then buffing with pro equipment. |
| Staining & Finishing | Apply the chosen color and a durable protective layer. | Apply sample stains (e.g., DuraSeal), multiple coats of finish (water/oil-based), buff between coats. |
Mastering this sequence requires significant experience. It is far more involved than a simple new install. The systematic approach guarantees a flawless result that enhances your home’s value and appeal.
Your investment is protected by the care of each step. Trusting this workflow to professionals is the surest path to stunning, renewed wood flooring.
How To Maintain Your Restored Floors
To ensure your gleaming hardwood surfaces remain gorgeous for decades, a dedicated maintenance plan is key. Your newly restored hardwood floor represents a significant investment. Simple, consistent care protects that investment and keeps the protective finish strong.
Following the guidelines from your professional team is crucial. Experts like Footprints Floors provide specific aftercare instructions. These steps preserve the pristine look and longevity of your beautiful floors.
Daily And Weekly Care Habits
Regular cleaning prevents microscopic scratches from dirt and grit. Establish these habits right after your hardwood flooring project is complete.
- Dry Cleaning: Sweep or dry dust mop daily in high-traffic areas. This removes abrasive particles that can dull the finish over time.
- Proper Mopping: Use a lightly damp mop with a pH-neutral wood floor cleaner monthly. Skip steam mops, excess water, and harsh chemicals. They can damage the sealant.
- Immediate Attention: Clean spills right away. This matters most with water to prevent damage.
These routines are the foundation of long-term care. They require little time but offer major benefits for your home’s value.
Protecting Floors From Spills And Damage
Accidents happen, but quick action prevents permanent harm. The first weeks after a major floor refinishing job are critical for the curing process.
Stick to initial curing guidelines from your restoration team. Limit foot traffic for 24 to 48 hours. Keep pets off the surface and avoid wearing shoes for at least a week.
Don’t move furniture back for at least three days. This allows the finish to fully harden and prevents dents.
For ongoing protection, use felt pads under all furniture legs. Place high-quality mats at entryways to trap dirt and moisture. Manage pet nails and avoid walking on floors with high heels or cleats.
Strategies For Long-Term Preservation
Think beyond daily cleaning to safeguard your floors for many years. Environmental factors and usage patterns play a big role.
- Control Humidity: Keep indoor humidity stable. This helps prevent expansion and contraction that can lead to gaps or cupping.
- Use Rugs Strategically: Place area rugs in high-traffic zones like hallways. Rotate them periodically. This helps prevent permanent fade lines on hardwood floors.
- Schedule Professional Check-ups: Periodic inspections by trusted experts can spot small issues early. This often prevents bigger work later.
Following these strategies extends the life of your refinishing project. It keeps your surfaces looking like new long after the job is done.
The True Cost Of Floor Restoration: Value And Investment
The price tag for professional renewal services is often a primary concern. It’s essential to view it as a strategic investment in your property.
Understanding the true expense involves more than a single number. Several key factors influence the final quote for your job.
Overall square footage, the extent of damage, your wood type type, and chosen finish all play a role. Each job is unique, requiring a custom assessment.
Footprints Floors points out that restoration is far less than a new installation, with financing options available to pay over time. Sunshine Hardwood Flooring offers free on-site consultations and estimates.
The value extends far beyond the initial price. You preserve the original character of your house and avoid the major disruption of a full tear-out.
Authentic wood significantly enhances property value. This makes the project a financially savvy improvement.
Your investment secures several critical advantages. It covers the expertise of a skilled team and their specialized equipment.
- High-quality materials ensure a durable and beautiful finish.
- This includes required repairs plus precise refinishing.
- You gain the elegance of renewed hardwood flooring without the high cost of replacement.
Consider the longevity a professional refinishing hardwood provides. A properly restored surface can last for decades with basic care.
This offers an excellent return on your investment over many years to come. It protects your hardwood floors for the future.
Always get multiple, detailed proposals. Compare what is included, like warranties on labor and materials.
A clear free estimate helps you assess the true cost and value for your specific areas. This knowledge allows for a confident, informed decision.
Why Choose Professional Floor Restoration In Boise
Local professionals combine deep-rooted knowledge with advanced technology to transform your living spaces. This choice ensures your wood receives meticulous care from start to finish.
You gain access to specialized skills and premium resources. These elements create a superior outcome that DIY attempts rarely match.
Decades Of Combined Expertise
Choosing a local group means tapping into deep, practical experience. Companies like Sunshine Hardwood Flooring bring owner-level, multi-decade knowledge to every job.
With four years’ of owner know-how, they understand local wood species and home styles. This expertise allows them to expertly manage any challenge that arises during the process.
Their long-term presence in the community builds trust. You benefit from proven techniques refined over a long career.
State-Of-The-Art, Dust-Controlled Equipment
Professional crews use advanced sanders with integrated dust collection systems. This technology creates a virtually dust-free environment during floor refinishing.
It protects your house’s air quality and simplifies cleanup dramatically. Compared to outdated methods, it represents a major advancement in service quality quality.
The equipment ensures a perfectly level surface for the new finish. This precision is crucial for a beautiful, long-lasting result.
Quality Materials And Warranties
Professionals invest in premium products for durability and beauty. They use industry-trusted stains like DuraSeal by Minwax and durable topcoat options options.
Choices include fast-drying Glitsa or high-performance water-based coatings. These materials are selected for their resilience and excellent results.
Reputable companies stand behind their work with warranties. Sunshine Hardwood Flooring, for example, offers a 1-year workmanship warranty.
This guarantee provides peace of mind that the work is done right. As Footprints Floors emphasizes careful attention to detail defines their top-quality results.
A professional team follows best practices for curing curing time and process efficiency. Their expertise translates to a consistent, high-quality finish that lasts for years.
Hear From Our Satisfied Boise Customers
Real homeowner stories offer the most genuine insight into what you can expect from a professional service. These testimonials provide a transparent look at the level of results and the service of the team. They turn abstract promises into tangible results you can trust for your own work.
Maryrae Fuller highlighted the value of a detailed proposal and clear communication. She noted that the timeline was respected and the final results exceeded her hopes. This positive outcome even led her to expand the original job to other areas of her property.
Attention to detail is a common theme in positive reviews. Tom Dove appreciated how the contractor diligently managed scheduling and stayed within budget during a complex remodel. This problem-solving ability gives homeowners great peace of mind.
For some, choosing a professional comes after a negative attempt elsewhere. Steven Cuskey turned to experts to rescue a botched job. The team successfully restored his damaged hardwood floors to a beautiful state, showcasing their skill in renewal.
“The crew was professional, respectful of our home, and delivered a finish that looks brand new. We’re thrilled with the transformation.”
Satisfaction often stems from the crew’s punctuality and respect for the living space. The transformative look achieved adds a touch of refinement to the entire house. Homeowners like Lily Adcock reported great happiness with a new LVP installation, praising the seamless process.
Proactive communication, as praised by Chase Rinehart, is another hallmark of a top-tier company. It ensures clients are informed at every step. This level of care builds strong relationships and trust.
These positive stories have a powerful ripple effect. Many reputable companies find that over half their business comes from repeat clients and referrals. This is a strong indicator of consistent service and customer satisfaction over many years.
Your hardwood job deserves the same level of expert care and outstanding results. Listening to those who have been through the process is a smart way to start your planning today.
Beyond Restoration: Our Comprehensive Flooring Services
A full-service flooring partner can handle everything from classic hardwood to modern vinyl installations. Many locally owned companies offer a complete suite of solutions. This meets all your interior surface needs under one roof.
Your property deserves consistent quality and a seamless experience. Choosing a provider with broad expertise ensures just that. You get a single point of contact for any related services.
Expert floor installation of new hardwood flooring adds timeless elegance. It is perfect for new spaces or entire residences. Skilled crews ensure a flawless fit and finish.
For kitchens, bathrooms, and entryways, tile tile installation offers durability and style. It handles wet areas with ease. You can achieve a custom look that complements your design.
Luxury vinyl plank (LVP) and vinyl are popular for active households. These materials provide water resistance and easy maintenance. They come in a vast array of designs that mimic wood or stone.
Some providers extend their skills to related remodeling tasks. For example, Footprints Floors handles bathroom renovations and kitchen backsplash projects. This offers a cohesive approach to improving your living space.
“We aim to be your trusted partner for all surface-related needs, from refinishing cherished original hardwood floors to installing the latest durable materials.”
Whether reviving original charm or adding new surfaces, comprehensive solutions guarantee uniformity. The same skilled pros manages the entire process. This saves you time and stress and reduces coordination stress.
Your Home Service Portfolio
| Service | Best Use Areas | Benefits |
|---|---|---|
| New Hardwood Installation | Living rooms, bedrooms, and formal spaces | Adds classic beauty, raises property value, and lasts a long time |
| Tile Install | Kitchens, bathrooms, mudrooms, entryways | Waterproof, very durable, easy to clean, many design options |
| LVP & Vinyl Installation | Throughout the home, especially high-traffic zones | Water resistance, comfort underfoot, scratch resistance, style |
| Remodeling Services | Bathrooms and kitchens (e.g., backsplash installation) | Creates a cohesive look, expert handling of multiple trades |
This breadth of solutions demonstrates deep material knowledge. Your provider understands how different products perform. They can recommend the best option for each room in your house.
Opting for a company with wide-ranging capabilities is a smart move. It future-proofs your planning for other improvements. You build a relationship with experts who know your flooring history.
Your investment is protected by their consistent attention to detail. From the first consultation to the final walkthrough, quality remains high. This makes any surface-related project a smooth and rewarding experience.
Conclusion: Bring New Life To Your Boise Floors
Renewing your home’s original hardwood floors is a powerful commitment in both its present comfort and future value. You now have the knowledge to make a confident choice.
Professional flooring services restore lasting appeal and performance to your wood floors. Partnering with a local crew of pros guarantees a high-standard result.
Take the first step this week. Contact Footprints Floors at (208) 607-3737 or Sunshine Hardwood Flooring for a free assessment. They offer consultations to plan your project.
This decision enhances your home’s appeal and protects its value for many years ahead to come.